



 Wyatt Maxwell
Want to let others hear Spotify music through your mic while you're chatting, gaming, or streaming? Whether you want to share music with friends on Discord, talk with teammates in a game, or play background music during a voice call, routing Spotify through your microphone can be a useful solution.
The challenge is that Spotify sends music to your selected playback device, not directly to a microphone input. To play Spotify through your mic, you need to route that audio to a virtual or system microphone that your communication app can recognize. The exact setup depends on whether you’re using Windows or Mac and which app you want to use.
In this guide, we'll walk you through the easiest ways to play Spotify through your microphone, with step-by-step instructions for different setups and voice chat apps. You’ll also learn how to troubleshoot common problems if Spotify audio isn’t being picked up by your mic.
- 💡 Part 1. Can You Play Spotify Through Your Mic?
- 🪟 Part 2. How to Play Spotify Through Your Mic on Windows
- 🍎 Part 3. How to Play Spotify Through Your Mic on Mac
- 🎙️ Part 4. How to Play Spotify Through Your Mic on Discord
- 💬 Part 5. How to Play Spotify Through Your Mic in Zoom, Teams & Game Chat
- 🔧 Part 6. Spotify Through Mic Not Working? Try These Fixes
- 🎵 Part 7. Alternative Way to Play Spotify Music Through Your Mic
Part 1. Can You Play Spotify Through Your Mic?
Yes, you can play Spotify through your mic, but Spotify does not provide a built-in feature for sending its audio directly to a microphone. Instead, you need to route Spotify's audio output to a system or virtual microphone that your communication app can recognize.
1. Can You Play Spotify Through a Microphone?
A microphone normally captures your voice as an audio input, while Spotify sends music to a playback device such as your speakers or headphones. To let other people hear Spotify music through your mic, you need to redirect the music from the audio output to a microphone input.
This is useful when you want to share Spotify music with friends on Discord, play music for teammates during a game, or include Spotify audio in a voice call or stream.
2. How Does Playing Spotify Through a Mic Work?
The basic idea is to create an audio route between Spotify and the microphone input used by your communication app:
In other words, the music is not actually played through your physical microphone. Instead, your computer routes Spotify's audio so that Discord, Zoom, or another voice application receives it as microphone input.
3. What Do You Need to Play Spotify Through Your Mic?
The setup depends mainly on your operating system and the app you want to use. Windows provides built-in audio features that can be used for basic audio routing, while Mac generally requires a virtual audio device. You will also need to select the correct microphone input in the voice or chat application.
- A Windows or Mac computer
- Spotify installed or available through the web player
- A system or virtual audio routing solution
- A communication app such as Discord, Zoom, Teams, or a game chat
- A microphone if you want to mix your voice with Spotify audio
Part 2. How to Play Spotify Through Your Mic on Windows
Windows offers several ways to route Spotify audio to your microphone. The simplest option is Stereo Mix, while VB-Cable and VoiceMeeter give you more control over how Spotify and microphone audio are routed. Choose the method that best fits your setup.
Method 1. Play Spotify Through Your Mic Using Stereo Mix
Stereo Mix is a built-in Windows audio feature that can capture the sound being played through your computer. If it is available on your PC, you can use it to send Spotify audio to Discord, game chat, or another application as microphone input without installing additional software.
Step 1. Enable Stereo Mix
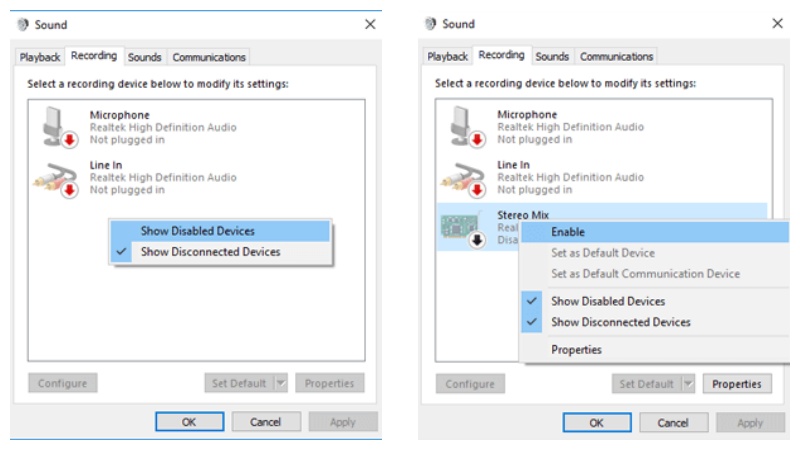
- Right-click the Speaker icon in the Windows taskbar and select Sound settings.
- Open More sound settings and switch to the Recording tab.
- Right-click an empty area and enable Show Disabled Devices.
- Find Stereo Mix, right-click it, and select Enable.
Step 2. Select Stereo Mix as Your Microphone
- Right-click Stereo Mix and select Set as Default Device.
- Open the voice or audio settings in the application you want to use.
- Select Stereo Mix as the microphone or input device.
- Open Spotify and play a song to test whether the application receives the audio.
Method 2. Play Spotify Through Your Mic Using VB-Cable
VB-Cable creates a virtual audio connection between your computer's output and input. It is useful when you want to route Spotify audio directly to a virtual microphone that can be selected in Discord, Zoom, game chat, or another voice application.
Step 1. Install VB-Cable
- Download and install VB-Cable on your Windows PC.
- Follow the installation instructions and restart your computer if prompted.
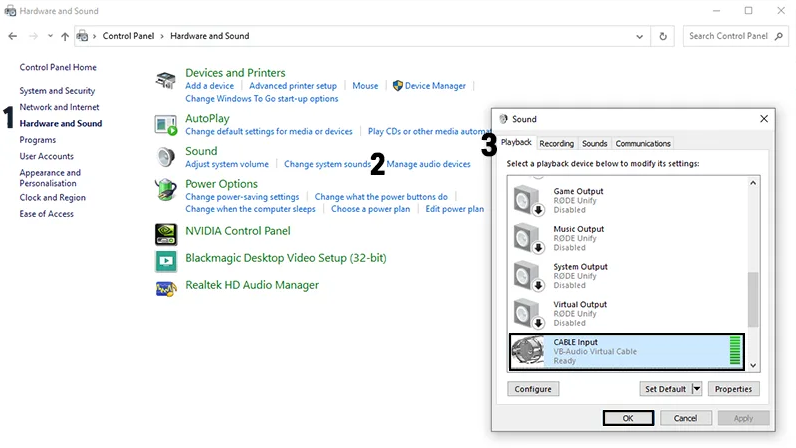
- Open Windows Sound settings and make sure the virtual cable devices are listed under your available audio devices.
Step 2. Route Spotify Audio Through VB-Cable
- Open Settings > System > Sound in Windows.
- Set CABLE Input as the output device for Spotify.
- Open Discord, Zoom, or another voice application.
- Select CABLE Output as the microphone or input device.
- Play Spotify and check whether the input level responds to the music.
Method 3. Play Spotify Through Your Mic Using VoiceMeeter
VoiceMeeter works as a virtual audio mixer, allowing you to combine multiple audio sources before sending them to another application. It is a good option if you want others to hear both Spotify music and your microphone at the same time.
Step 1. Install and Configure VoiceMeeter
- Download and install VoiceMeeter on your Windows computer.
- Restart your computer if the installation requires it.
- Open VoiceMeeter and select your physical microphone as a Hardware Input.
- Select your preferred headphones or speakers as the hardware output device.
Step 2. Send Spotify Audio to VoiceMeeter
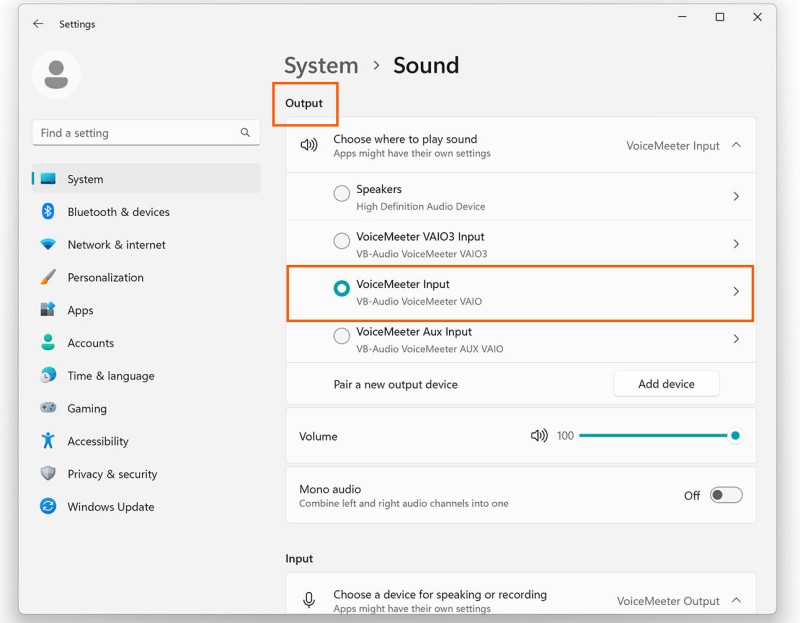
- Open Windows Sound settings.
- Set the appropriate VoiceMeeter Input device as the playback device used by Spotify.
- Return to VoiceMeeter and make sure Spotify audio is being received.
Step 3. Mix Spotify and Your Microphone
- Make sure your physical microphone is active in VoiceMeeter.
- Enable the appropriate output routing for the Spotify audio.
- Enable the same virtual output for your microphone so both sources are sent together.
- Open Discord, Zoom, or your game and select the corresponding VoiceMeeter Output as the microphone input.
- Play Spotify and speak into your microphone to make sure both audio sources are being transmitted.
- Stereo Mix: Best for a simple setup using Windows' built-in audio feature.
- VB-Cable: A straightforward option for routing Spotify audio through a virtual microphone.
- VoiceMeeter: Best when you need to mix Spotify with your microphone or manage multiple audio sources.
Part 3. How to Play Spotify Through Your Mic on Mac
Mac does not provide a built-in way to use Spotify as a microphone input. However, you can use a virtual audio driver such as BlackHole to route Spotify audio to a virtual input. This allows another application to receive Spotify playback as microphone or audio input.
Method 1. Play Spotify Through Your Mic Using BlackHole
BlackHole creates a virtual audio connection between your Mac's audio output and input. By creating a Multi-Output Device, you can continue listening to Spotify through your headphones or speakers while sending the same audio to BlackHole.
Step 1. Install BlackHole
- Download and install BlackHole on your Mac.
- Complete the installation and restart your Mac if prompted.
- Open Audio MIDI Setup from Applications > Utilities.
- Make sure BlackHole appears in the list of available audio devices.
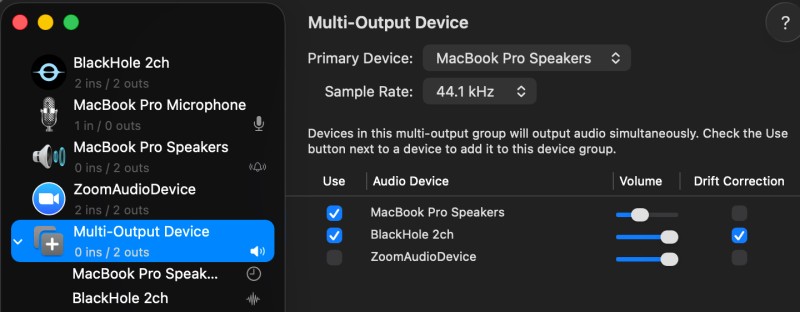
Step 2. Create a Multi-Output Device
A Multi-Output Device lets your Mac send the same Spotify audio to both your normal audio output and BlackHole at the same time.
- Open Audio MIDI Setup.
- Click the + button in the lower-left corner.
- Select Create Multi-Output Device.
- Select both your headphones or speakers and BlackHole.
- Select your physical audio output as the Primary Device.
Step 3. Set the Multi-Output Device as Your Output
- Open System Settings on your Mac.
- Go to Sound > Output.
- Select the Multi-Output Device you just created.
- Open Spotify and play a song to make sure you can still hear the music through your headphones or speakers.
Step 4. Use BlackHole as an Audio Input
Once Spotify audio is being sent to BlackHole, you can select BlackHole as the microphone or input device in the application where you want to share Spotify audio.
- Open the audio or microphone settings of the application you want to use.
- Find the Microphone or Input Device option.
- Select BlackHole as the input device.
- Play Spotify and check whether the application's input indicator responds to the music.
Method 2. Play Spotify and Your Voice Through Your Mic on Mac
If you want to play Spotify through your mic while also talking, you need to combine Spotify audio and your microphone into a single virtual output. Since Method 1 already routes Spotify audio to BlackHole, you can use BlackHole as one input source and your physical microphone as another.
Step 1. Add Spotify and Your Microphone to an Audio Mixer
Open an audio-mixing application that supports multiple input sources. Add BlackHole as the input for Spotify audio and add your physical microphone as a separate input.
- Add BlackHole as an audio input.
- Add your physical microphone as another input.
- Make sure both audio sources are active.
- Adjust the Spotify and microphone volume independently.
Step 2. Send the Mixed Audio to a Virtual Output
- Select a virtual output provided by your audio mixer.
- Route both the Spotify and microphone channels to this output.
- Play Spotify and speak into your microphone to make sure both sources are being mixed.
- Lower the Spotify volume if the music is louder than your voice.
Step 3. Select the Mixed Output as Your Mic
- Open the microphone or audio settings of your voice application.
- Select the audio mixer's virtual output as the microphone or input device.
- Play Spotify and speak into your microphone at the same time.
- Adjust the music and microphone levels if either source is too loud or too quiet.
- BlackHole only: Best if you only need to send Spotify audio to another application as microphone input.
- BlackHole + audio mixer: Better if you want to share Spotify music and your voice at the same time.
Part 4. How to Play Spotify Through Your Mic on Discord
After routing Spotify audio to a virtual audio device, you can use that device as the microphone input in Discord. This lets you share Spotify music in a voice channel without changing the audio-routing setup you created earlier.
Method 1. Play Spotify Through Your Mic on Discord
Step 1. Open Discord Voice Settings
- Open Discord and click the User Settings icon.
- Select Voice & Video from the left sidebar.
- Find the Input Device option under Voice Settings.
Step 2. Select the Virtual Audio Device
Select the virtual audio device that you configured in Part 2 or Part 3. The name depends on your operating system and audio-routing method:
- Windows Stereo Mix: Select Stereo Mix.
- VB-Cable: Select CABLE Output.
- VoiceMeeter: Select the corresponding VoiceMeeter Output.
- Mac BlackHole: Select BlackHole.
Step 3. Test Spotify Audio
- Start playing a song in Spotify.
- Watch the microphone input indicator in Discord.
- If the input indicator responds to the music, Discord is receiving your Spotify audio.
- Join a voice channel and check whether other participants can hear the music.
Method 2. Play Spotify and Your Voice Together on Discord
If you want to talk while playing Spotify, simply selecting a virtual audio device may not be enough. A basic virtual cable usually carries Spotify audio only, so your physical microphone needs to be mixed with the music before the audio reaches Discord.
Step 1. Combine Spotify and Your Microphone
- Open your audio mixer or virtual audio routing software.
- Add Spotify as one audio source.
- Add your physical microphone as another audio source.
- Send both sources to the same virtual output.
- Adjust the music and microphone levels so your voice remains clear.
Step 2. Select the Mixed Output in Discord
- Go to Discord > User Settings > Voice & Video.
- Open the Input Device menu.
- Select the virtual output containing both your microphone and Spotify audio.
- Play Spotify and speak into your microphone to test both sources.
Step 3. Adjust Discord Voice Settings
Discord uses voice-processing features designed mainly for speech. These settings can sometimes reduce or interrupt music. If your Spotify audio keeps cutting out, check the following settings:
- Check Input Sensitivity and make sure the music reaches the input level required by Discord.
- Check Noise Suppression if music is being reduced or removed.
- Check other available voice-processing options if the music sounds heavily compressed or interrupted.
- Test the setup again after changing the settings.
Spotify Through Mic on Discord: Quick Setup
| What You Want to Do | Recommended Setup | Discord Input |
|---|---|---|
| Share Spotify only | Virtual audio device | Virtual audio output |
| Share Spotify + your voice | Audio mixer + virtual output | Mixed virtual output |
| Hear Spotify + share it | Multi-output audio routing | Virtual audio output |
Part 5. How to Play Spotify Through Your Mic in Zoom, Teams & Game Chat
Once Spotify audio is routed to a virtual microphone, you can use the same setup in other communication and gaming applications. In most cases, you only need to select the virtual audio device as the microphone or input. The exact setting may vary depending on the application.
1. Play Spotify Through Your Mic in Zoom
Zoom lets you choose which microphone is used for meetings and calls. Select the virtual audio device that is receiving your Spotify audio.
Set Spotify as the Zoom Microphone
- Open Zoom and go to Settings > Audio.
- Find the Microphone setting.
- Select your virtual audio device, such as Stereo Mix, CABLE Output, VoiceMeeter Output, or BlackHole.
- Play Spotify and use Zoom's microphone test to check whether the music is detected.
2. Play Spotify Through Your Mic in Microsoft Teams
Microsoft Teams also allows you to select a microphone for calls and meetings. Choose the same virtual input that receives your Spotify audio.
Set Spotify as the Teams Microphone
- Open Microsoft Teams and go to Settings.
- Open the Devices or audio settings section.
- Find the Microphone setting and select your virtual audio device.
- Play Spotify and check whether Teams detects the audio input.
3. Play Spotify Through Your Mic in Game Chat
Many PC games provide a microphone or voice-chat setting. If the game allows you to choose an input device, select the virtual audio device receiving Spotify.
Set Spotify as the Game Chat Microphone
- Open the game's Audio, Voice Chat, or Communication settings.
- Find the Microphone or Input Device option.
- Select the virtual audio device receiving your Spotify audio.
- Play Spotify and use the game's microphone test, if available.
If the Game Does Not Let You Choose an Input
Some games use the system's default microphone instead of providing their own input selection. In this case, set the virtual audio device as the default microphone in Windows or macOS before starting the game.
Which Input Device Should You Select?
The input name depends on the audio-routing method you configured earlier. Use the corresponding virtual input rather than selecting your physical microphone when you want to send Spotify audio.
| Setup | Input to Select | Best For |
|---|---|---|
| Stereo Mix | Stereo Mix | Windows built-in audio routing |
| VB-Cable | CABLE Output | Sending Spotify audio to one application |
| VoiceMeeter | VoiceMeeter Output | Mixing Spotify and microphone audio |
| BlackHole | BlackHole | Mac audio routing |
Part 6. Spotify Through Mic Not Working? Try These Fixes
If Spotify is playing normally but your voice app cannot detect the music, the problem is usually somewhere in the audio path. Check the connection from Spotify output to the virtual audio device and finally to the app input. The following fixes can help you quickly identify and resolve common problems.
Fix 1. Make Sure Spotify Is Using the Correct Audio Output
Spotify must send its playback audio to the output device connected to your virtual microphone. If Spotify is using your headphones, speakers, or another output instead, the virtual input may not receive any signal.
- Start playing a song in Spotify.
- Check Spotify's available playback or output device settings.
- Make sure Spotify is using the audio route configured in Part 2 or Part 3.
- Check whether the virtual audio device is receiving the Spotify audio signal.
Fix 2. Select the Correct Virtual Microphone
Even when Spotify is routed correctly, your communication app may still be using your physical microphone as the input. Select the virtual audio device that receives Spotify instead.
- Open the Audio, Voice, or Microphone settings of your application.
- Find the Input Device or Microphone option.
- Select the virtual device you configured for Spotify.
- Play Spotify and check whether the application's input indicator responds to the music.
Depending on your setup, the input may be named Stereo Mix, CABLE Output, VoiceMeeter Output, or BlackHole.
Fix 3. Turn Off Noise Suppression and Voice Processing
Voice applications are designed primarily for speech. Features such as noise suppression, echo cancellation, and automatic voice processing may treat Spotify music as unwanted background noise and reduce or remove it.
- Open your application's Audio or Voice settings.
- Look for options such as Noise Suppression, Echo Cancellation, or other voice-processing features.
- Temporarily disable these features and test Spotify again.
- If the music is detected normally, adjust the voice-processing settings to find a suitable balance between music and speech.
Fix 4. Adjust Spotify Volume and Input Sensitivity
If people can hear your voice but Spotify keeps cutting out, the music may be too quiet for the application's voice detection. On the other hand, music that is too loud can make your voice difficult to hear.
- Lower or raise the Spotify playback volume as needed.
- Check the application's Input Volume or Input Sensitivity setting.
- Play Spotify and watch the application's input indicator.
- Adjust the levels until the music is detected consistently without overpowering your voice.
Fix 5. Spotify Works, but Your Voice Is Not Heard
If other people can hear Spotify but cannot hear you, your virtual input may be carrying only the music. A virtual cable or BlackHole does not automatically combine Spotify with your physical microphone.
In this case, use an audio mixer to combine both sources before sending them to your voice application.
Spotify + Physical Microphone → Audio Mixer → Virtual Output → Voice App
- Add your physical microphone as an input source in your audio mixer.
- Add the Spotify audio source as another input.
- Route both sources to the same virtual output.
- Select that mixed virtual output as the microphone in your voice application.
For detailed setup instructions, see the Windows and Mac methods in Part 2 and Part 3.
Fix 6. Check Microphone Permissions and Restart the Audio Route
If the correct virtual device is selected but the application still receives no audio, check your system permissions and restart the audio route.
Check Microphone Permissions
- On Windows, open the microphone privacy settings and make sure the application is allowed to access audio input.
- On Mac, go to System Settings > Privacy & Security > Microphone and make sure the application has permission.
Restart the Audio Route
- Close Spotify and your voice application.
- Check that the virtual audio device is still available.
- Reopen your virtual audio mixer or routing software, if applicable.
- Start Spotify and play a song.
- Reopen Discord, Zoom, Teams, or your game and select the virtual input again.
Part 7. Alternative Way to Play Spotify Music Through Your Mic
If virtual audio routing feels too complicated, you can take a simpler approach: save Spotify music as local audio files first. You can then play the files with a media player and route the playback through your existing audio setup instead of sending Spotify's live audio directly to a virtual microphone.
Macsome Spotify Downloader makes it easy to save Spotify songs, playlists, albums, podcasts, and audiobooks as local audio files. It supports MP3, AAC, FLAC, WAV, AIFF, and ALAC, while preserving high-quality audio and ID3 tags. Once the music is saved, you can play it with your preferred media player and send its audio to Discord, Zoom, Teams, or game chat using your existing audio-routing setup.
Why Choose Macsome Spotify Downloader?
- Download Spotify songs, albums, playlists, podcasts, and audiobooks as local audio files.
- Save Spotify music as MP3, AAC, WAV, FLAC, AIFF, or ALAC.
- Customize the output quality and save music in up to 320 kbps for MP3.
- Batch download multiple Spotify songs or entire playlists at once.
- Preserve ID3 tags, album artwork, and other important metadata.
- Support both Spotify App Mode and Web Player Mode.
- Play downloaded Spotify music with your preferred media player or audio application.
- Use local Spotify audio files with your existing virtual audio routing setup.
How to Download Spotify Music with Macsome Spotify Downloader?
Step 1. Download, install, and launch Macsome Spotify Downloader on your Windows PC or Mac. The software supports both Spotify App Mode and Web Player Mode, so you can choose the mode that best fits your setup.
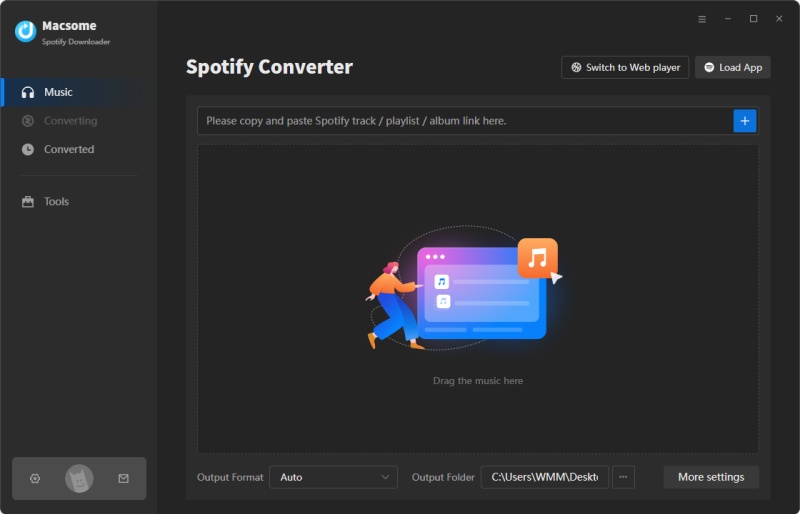
Step 2. Open Settings to configure the output before downloading. Choose from MP3, AAC, FLAC, WAV, AIFF, or ALAC, adjust the available audio quality settings, and select a local Output Folder where you want to save the downloaded music.
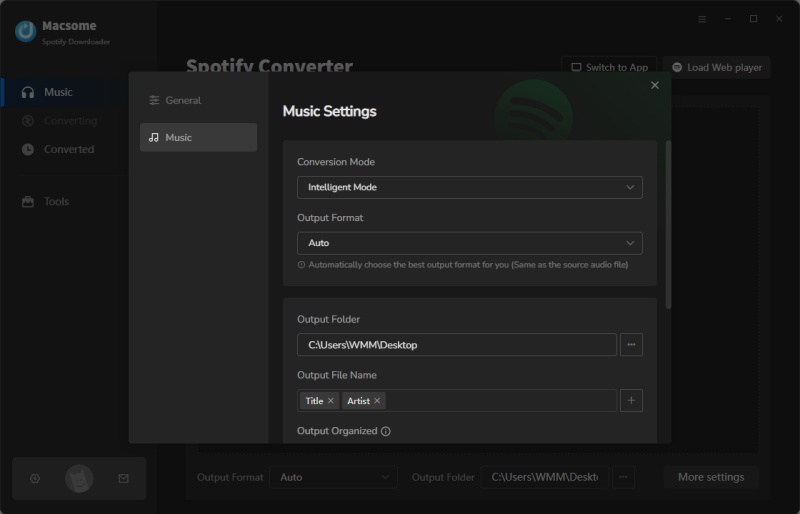
Step 3. Open Spotify and find the songs, albums, playlists, podcasts, or audiobooks you want to download. Click "Click to add" to add the selected items to the download list. You can add multiple tracks or playlists at once for batch downloading.
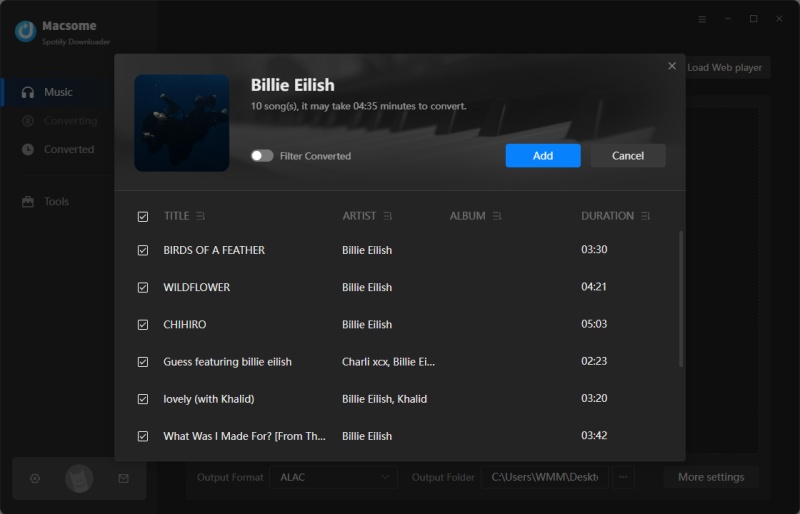
Step 4. Click the "Convert" button to start downloading. Once the process is complete, open the "History" section to find your downloaded Spotify music files. Macsome automatically preserves important metadata such as ID3 tags and album artwork, making the files easier to organize in your local music library.
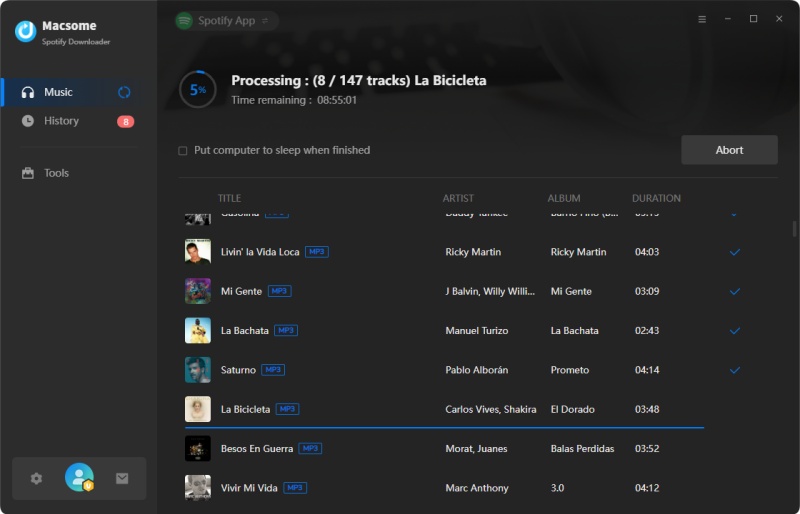
Once your Spotify music is saved locally, you can open the downloaded files with a media player and route the playback through the virtual audio device configured earlier. This allows you to use your local Spotify music with Discord, Zoom, Teams, or game chat.
Conclusion
Playing Spotify through your mic is possible with the right audio-routing setup. Whether you're using Windows or Mac, you can route Spotify audio through a virtual input and share it with others on Discord, Zoom, Teams, or game chat. If you want more control, you can also combine Spotify audio with your microphone so others can hear both your music and voice.
If you prefer to work with local audio files, Macsome Spotify Downloader offers another convenient option. You can save your favorite Spotify music as local audio files, play them with your preferred media player, and then route the playback through your existing audio setup.
Download your favorite Spotify music, play it your way, and route it through your mic whenever you want to share it.